
16 Dec
Creative Photo Framing
While sorting through the pictures for yesterday’s post about my new camera I realized that some of the shots could easily be turned into other photography tutorial posts (so many of you have emailed and commented to say how much you love these posts and that they’ve helped you, thanks so much!). Part of the reason I don’t do these posts very often is that I don’t have subjects (aka kids (yet!)) to practice on and I think concepts are best demonstrated when they can be seen. Now that I know what a good model my friend’s daughter is I can use her whenever a post topic comes to mind. ![]()
For this post I chose a few shots that will hopefully help you start thinking outside of the box when it comes to framing your photos. Normally I would have discarded some of these due to bad focusing, but I kept them because they illustrated the principles I had in mind. It’s all in the eyes people! If the eyes aren’t sharp, the photo needs to go (unless you’re writing a post for your blog and don’t have any other photos that illustrate your point, then you can keep them.)
First thing you need to do? Stop centering your subjects right in the middle of the frame in every single shot! Learning about the rule of thirds can help, but I admit I don’t frame each photo in camera thinking “How can I set up this photo so I’m following the rule of thirds?” Most of the time I just try to shoot what feels natural, and with digital photography I have the freedom to take as many shots as I want without incurring any extra costs like I would with film. Don’t be afraid to experiment, or worry about other peoples opinions when they say “Gee, you take a lot of pictures don’t you?” All those snide commenters will shut their traps when they see the amazing photos you get after you practice, practice, practice!
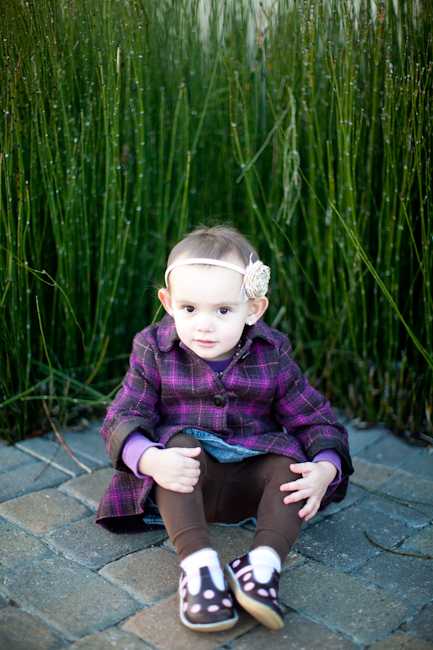
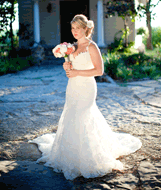
An example of a photo I consider to be centered. I admit, I had to work really hard to remember to center her in one of my photos. It’s just not something that felt natural in this situation.

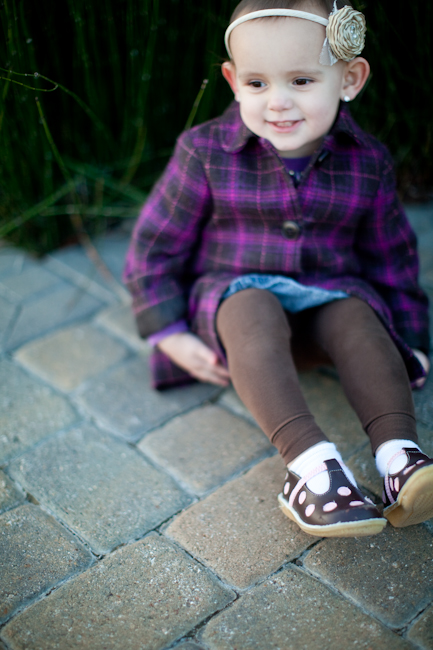
And here she is placed just to the right of where she was before. Much better, don’t you think? (I think the tighter crop and sweet expression on her face help a bit as well!)
Step #1, don’t place your subjects in the center of the frame every time you snap a photo. Shifting them just barely to the right or left can make a huge difference!

Another really common mistake I see is from poor framing when it comes to distance and how much is included in the frame. She’s in such a cute post, but she’s lost in a sea of bricks and reeds, and my eye keeps going tothe top left corner where I think I can see someone’s front door. Yes, I could crop it later using software on my computer but why not…

take a few steps forward to capture this? I like to shoot with something called a “prime lens”, meaning there is no zoom. AT ALL. Out of all the things that trip people up when I hand my camera over and ask them to take a picture of me, the lack of zoom is the most confusing part. Prime lenses are a big part of my personal photographic style, and eventually I hope to shoot with them exclusively, so I’m used to moving around when I’m shooting. Also, I hardly ever crop using computer software, as I like to rely on my judgement in the moment to capture a scene. All of the photos in this post (actually all the photos from this shoot that I will post on the blog) weren’t even touched with the crop tool, only adjustments to exposure, contrast, etc, were made.
Step #2, move your feet! You’ll get better photos in camera, and you’ll get a little more exercise at the same time.
Step #3, don’t be afraid to get a little crazy with the way your frame your photos!
Maybe you want to have lots of negative space around your subject, like in the photo below. I think that the way this photo is framed, combined with her slouching forward a bit, makes her look extra inquisitive. If only it were in focus. ![]()

Another negative space example. I usually would toss this one, as I don’t think it’s anything special, but I like the concept and I think I’ll be working on incorporating more negative space into my other photos. See how I’m not afraid to make mistakes and experiment? Try something new, you can do it!

Sometimes I like to get really crazy, just to see what happens. Her head is cut off (you’ll notice that pro photogs cut heads off all the time, it’s not the bad thing most people think it is), as is one of her feet, and no specific part of the photo is really in focus, but I kind of like it anyway. Mom will never frame it, I won’t be using it as an example in my portfolio, but I think I’d like to try something like this again in the future.
These are just a few examples. there are a million other ways to be discovered! See how we are all still learning? You. Me. All of us.
If you try this out for yourself, do leave a link to your in the comments section. I’d love to see how it worked out for you! (And maybe I’m secretly hoping you’ll come up with an awesome idea I can use myself some time. ![]() )
)
Also:

 I'm a farm-raised almost-crunchy stroller-pushing picture-taking lifestyle-blog-writing gastronomy-obsessed divine-seeking thrift-store-combing cheese-inhaling pavement-pounding laughter-sprinkling lover of individuality and taking chances.


I love these posts! I can’t wait to get my very first dslr camera for Christmas so I can start experimenting. I never thought about the eyes, but you are right, they make or break the photo. (Especially noted in my point and shoot pictures that always have red-eye…)
1Awesome tips. I need them. I just wish my little piece of junk digital camera could capture that kind of color.
2I love posts like this. I’ve been learning to shoot with a dslr for the first time at my job - I’m in publications and I have to take pictures at a ton of events, but I’m a trained writer, not a photog!! I’m constantly looking to improve my skills, and if I can do it while reading one of my favorite blogs, well, score! /thanks
3A girl after my own heart. I love my one prime lens (a 50 mm). I would love to also get a 35 mm, and I have been drooling over an 8mm lately too (I’m sure people would LOVE my lens RIGHT IN THEIR FACE, too).
4I have a quick question for you…
Do you use a photo hosting site (like pictage or smugmug)? If so, what do you use? I’m looking use a hosting site besides flickr.
Jenna Reply:
January 13th, 2010 at 1:14 am
A hosting site to store photos? I sort of use Flickr, but more for the social interaction. I just recently started uploading all of my photos directly to my site instead of hosting them on Flickr and grabbing the code.
Courtney Reply:
January 14th, 2010 at 2:10 am
I was thinking more for client use for ordering or sharing with family and friends. A site more like smugmug, pictage, or whatever some of the others are. Thoughts…?
Jenna Reply:
January 14th, 2010 at 11:10 am
I’m self hosting with PhotoCart. It’s a program you download onto your site for something like $300. I went that route because using it means that I pay a one-time download fee to set it up, and then all sales profits from my prints are mine. Pictage automates a lot for you but takes a huge cut of your profits, and I imagine SmugMug has some kind of monthly fee or takes a cut as well.
jenna! i’ve been the worst blog reader lately, but i just spent the last several minutes catching up on everything you’ve posted since october (i’m that bad!) and i love it ALL! i love the pregnancy posts, the ultrasound stuff, the birthing center… i love the nativity exhibit (shoot i missed it!), your amazing wedding album, thanksgiving…and HUGE congrats on the mark II! amazing amazing!!!
6Love these posts…and LOVE the profile shot! So adorable!
7I *love* that last one, I would totally frame it if she were my little girl.
8I love reading your site. I just got a nikon D3000 and have had tons of fun reading all your stuff and then trying out different photos. the help is much appreciated. lol
9I’m like Erica and just got a Nikon D3000 a couple of months ago and I can’t tell you how appreciative I am of your photography posts. I have found some great tips and direction from them. Please keep doing them because they are a great resource for newbies like me!
10Your photography is PHENOMENAL. Someone just pointed me in the direction of your blog. I need all the photography help I can get.
11Hi Jenna, I’m not sure if you still read/respond to comments on these old posts but I have a question. When cropping photos, both for your blog and for clients, how do you choose the ratio? I know that cameras mostly shoot 6:4 or 6:4.5, and I know about the “golden ratio” (that’s what it’s called, right?) but is it okay to choose other sizes? Whenever I crop photos differently, they always come out looking awkward.
Thanks, I love your photo tutorials!
12