
25 Mar
Shutter Speed
How did….
I capture these four people spelling out the word love using sparklers?

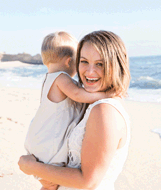
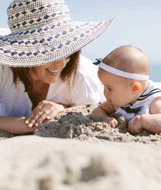
I freeze this baby as she flew in the air while her parents smiled up at her?

I freeze the mom while emphasizing the movement of her kids?

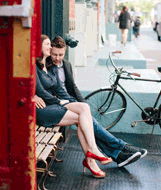
I make this couple look like movie stars as the subway flew past them and their hair whipped around rather glamorously?

The answer? All of these effects were achieved using different types of shutter speed manipulations.
What is shutter speed?
You know that little “click” sound you hear when you take a picture? That’s the shutter opening and closing. When you take a picture in a bright setting, the shutter clicks really fast. When you take a picture in a dark setting (without the flash) the shutter takes a lot longer to go make the clicking sound.
The shutter of your camera is like your eyelids, to give it a very basic explanation. When you are in a very bright place, you only need to keep your eyes open for a short period of time because the light is so bright, and you want to let less light in. When you are stumbling around in the dark, you keep your eyes open longer to let in more light. Shutter speed is the setting you manipulate on your camera to affect how long the shutter stays open.
Shutter speed is measured in parts of a second. It will usually be measured in numbers from something like 15″ (that’s 15 seconds) to 1/4000 (that is 1/4000th of a second). 15″ is a really really long exposure. 1/4000 is a really really fast exposure. Don’t let the numbers scare you. There are a lot of them, but the operate on a scale from largest to smallest, so one you understand what the fastest and shortest shutter speeds do you will be able to understand what the middle ones do as well! FYI, my camera displays 1/2000 as just “2000″ and 2″ as “0″2″.
To let more light into your camera (done in dark situations), you use a longer (aka slower) shutter speed. To let less light in your camera (done in bright situations), you use a shorter (aka faster) shutter speed.
A good rule of thumb to use is to make sure that your shutter speed number is bigger than the focal length of your lens. When I’m using a 50mm lens, I try not to shoot with a shutter speed slower than 1/80. If I have my 135mm lens on my camera, I try to keep it at 1/200 if I can.
Shutter Speed and Exposure
Have you heard the term exposure before? An overly exposed picture is very bright, and an under exposed picture is very dark. Shutter speeds affects the exposure of your picture. Both of these pictures are straight out of camera.
This one is over exposed. Too bright!

This one is under exposed. Too dark!

Shutter Speed and Motion
The reason why shutter speed can be so tricky is that it’s not only related to exposure, but also to movement. I’ve had several emails asking me about why picture turn out blurry. Some of you have asked me “Do I need to change my ISO?” Nope, changing your ISO won’t affect how blurry your photos are at all, sharper pictures are going to be achieved by changing the shutter speed.
At my friend’s wedding, the area where she got dressed was very dark and I had to work quickly to find the right settings to capture her getting into her dress. For this moment, I did not choose well, as you can see my shutter speed was too slow to freezer her MOH’s hand. The hand is blurry (and the bride isn’t very sharp either). My shutter speed for this image was 1/100.

For this funny moment later int he day, I was better prepared. As the bride dipped back for a kiss, her veil started to fall. She stood up and tried to catch it, but wasn’t fast enough. Because my shutter speed was fast 1/1600 sec, I was able to freeze the veil as well as the couple as they reacted to the moment.

I decided to use a little toy that my son loves to play with to show how shutter speeds can freeze or emphasize motion.
Shutter speed of 1/250
1/250 is a relatively fast shutter speed, which means the shutter wasn’t open for very long. Although my son is reaching out and petting his dog toy, his hand is frozen in mid-air. If he had been running around in circles and I wanted to freeze him in action, I’d want to choose something more like 1/800, or 1/2000. (Your meter will help you determine the correct one.)

Shutter speed of 1/15
When my shutter speed goes down to 1/15th of a second, my son starts to blur and you can see why this toy is so fun. When you push on the back, the tail wags back and forth!

Shutter speed of .4 sec
This shutter speed is really slow, and difficult to use without a tripod. As you can see, when my shutter is open this long, items in motion are blurry and will sometimes have trails behind them.

What jumping up and down on the couch with a shutter speed of .4 sec looks like. ![]() If I wanted to get him jumping in the couch with a nice big smile on his face that you could see clearly, I would have chosen a shutter speed more like 1/800.
If I wanted to get him jumping in the couch with a nice big smile on his face that you could see clearly, I would have chosen a shutter speed more like 1/800.

I found this really great chart at Digicamhelp.com to help you understand what shutter speed you might want to use in different situations you might encounter.
| SUGGESTED SHUTTER SPEEDS | |
|---|---|
| TO FREEZE ACTION* | TO CAPTURE MOTION** |
| Children - 1/250 - 1/1000 seconds | Amusement park rides: +/- one second |
| Moving water/waterfalls: 1/1000 seconds or more | Moving water/waterfalls: 4 or more seconds |
| Sporting event: 1/500 - 1/2000 seconds | Fireworks: 1/2 - 4 seconds |
| Birds in flight: 1/1000th a second and above | Moving cars at night: 8-10 seconds |
| Night photography - one or more seconds | |
I thought it might be good to point out that really cool photos like the one below Natalie Moser are not done using shutter speed. Effects such as these are achieved using a program like Photoshop.

If you want to look at some really amazing photos that show the results of different techniques that use shutter speed manipulation, visit this link.

After getting through all of that information are you ready to start practicing? You are in luck! Your camera likely has a special setting called Shutter Speed Priority which will let you change the shutter speed to different settings, and the camera will do the rest of the work! This way you can practice learning to use movement without worrying about aperture or ISO.
On the left side of this photo you can see a small wheel that says things like “User”, “P”, “SV”, “TV”, etc. Your camera should have a similar wheel. If you would like to use your camera on Shutter Speed Priority you need to turn this wheel to TV. Then you need to go get your manual and figure out which buttons to push or scroll to change the shutter speed from there. ![]()

Please note that sometimes it is just too bright or too dark to take a photo at a certain shutter speed. So turning it to shutter speed priority isn’t going to give you amazing photos no matter what. Your camera isn’t magic!
Have fun practicing!
Also:

 I'm a farm-raised almost-crunchy stroller-pushing picture-taking lifestyle-blog-writing gastronomy-obsessed divine-seeking thrift-store-combing cheese-inhaling pavement-pounding laughter-sprinkling lover of individuality and taking chances.


You are wonderful (and beautiful)…I just love the tutorials and FINALLY it is making sense to me!
1I have really enjoyed these, but thanks so much for posting those numbers on freezing action and capturing motion!! Experimenting is good, but those give me ideas on what works. Thanks!
2I have a question about the trails of light one. I’ve been wondering this for ages! Now I know presumably they’re made by someone running around with a sparkler/flasshlight/whatever, but how is it that that person doesn’t end up in the shot as a blurry ghost??
Oh and another one - how did Kelly Moore make the background blurry and the bride still? I should know this but I don’t…
Jenna Reply:
March 26th, 2009 at 4:25 pm
Kelli Nicole just explained the process of creating that ribbons of light photo to me yesterday. It works best if you have three people. Camera man, flashlight man, and flash man.
The camera is set for a very very long shutter speed, sitting on a tripod. The button is depressed and the shutter opens. The flashlight man runs around the couple waving the flashlight around. After he is out of the frame flash man sets the flash off (this is what illuminates the couple). And then the shutter closes.
The picture is taken in complete darkness, and this is what keeps the person holding the flashlight from ever being illuminated. As long as he points the flashlight away from his body at all times, the camera never “sees” him.
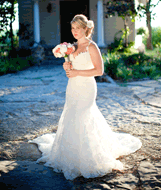
As far as the Kelly Moore shot,t his effect is achieved by “panning” the camera along with the moving subject. Focus on the face and move the camera along with the subject. (She may have done this in Photoshop by blurring the image, but it is possible to also achieve the effect in camera by panning)
Ruby Slippers Reply:
March 26th, 2009 at 5:06 pm
Thanks so much! I sooo want to try a ribbon of light shot oneday!
Wow, you are such a great teacher, Jenna. I’m a total newb (meaning, I don’t really even touch a camera - and I still feel like I’m learning so much!) So, how do you make the background blurry and the person in the foreground still? I still don’t get it.
Jenna Reply:
March 27th, 2009 at 9:59 pm
Well, if you are talking about effects like the first two pictures in the post (the couple standing in front of the subway and the bride walking) those are done using movement.
In the case of the train, all you have to do is slow down your shutter speed and have the couple in front of the train stand very still. Because they are still and the train is moving, you will have one thing in focus and the other thing blurry.
The bride picture can be achieved using a technique called panning. You would turn down your shutter speed just a little bit, and move your camera in the same direction as the bride as she moves very quickly. This will make all of the things that are still be blurry, and since your camera is moving with the bride she will stay in focus. You can actually practice this technique yourself while riding in a car or a train. When you are moving very quickly, move your camera in the same direction that you are moving (very quickly) and take a picture at the same time and see what happens!
If you are talking about having one thing in focus in your picture and the rest of it blurry, that has to do with the aperture, which is what I wrote the next post in this series on.
I want to learn it all but have such a hard time grasping what I need to do and when. You do an amazing job explaining things though and I have spent several days reading through your tutorials. I have the hardest time with shutter indoors it seems. If my camera is set on TV I just can’t get a decent shutter speed to get rid of the blur. It’s just darkness. Set on P it’s a little better but I’m so frustrated! I hope you continue to post more:)
5Kelli Nicole referred me to your website and I’m finding your tutorials to be INCREDIBLY helpful! Thank you so much! haha Except that I was leaving out the “flash man”. But my husband doesn’t need to know.
  We also experimented with that same idea last summer, using sparklers instead of a flashlight. Lots of fun!
6My husband and I had a “discussion” about how to do the ribbon of light photo. I’m glad someone else asked about it and you explained ’cause now I win.
Keep up the good work here and THANKS again!
re-reading all of your previous photography posts. I want to get started with all of these tips, but man, it seems so intimidating!!
7HI! Loving this tutorial & you put it in the perfect lamen terms!! I can’t wait to read more!!!
8