
26 Mar
Aperture
I chose to explain aperture last because it is the last photography concept of the bunch that I came to understand. I’m not sure why it was so hard for me, but I went for months only shooting on shutter speed priority because I just couldn’t understand what aperture was or how to use it. Then one day everything kind of clicked for me! Hopefully reading this post will help you have that “A-ha!” moment as well.
What is aperture?
You’re going to have to work hard to stay with me on this one because there are several different terms I’m going to have to use to explain this concept. Just like the other concepts, aperture has to do with light (photography is all about light if you haven’t realized it by now). First I’ll show you the part of your camera that is affected when you change the aperture.
Ignore the numbers for a second, we will come back to those.
See that little circular thing? It’s called a diaphragm. The width of that opening determines your aperture. Except it all gets very confusing because a BIGGER opening means a SMALLER aperture number. This is what kept me so confused for so long. I just couldn’t remember the bigger/smaller thing. If you keep reading I’ll teach you the phrase that helped me remember how it works. ![]()

Aperture, like everything else, is all about light. Having the opening very small lets in less light. Having it very big let’s in lots of light. Now look at the picture above again. See the numbers? Those are the measurements of the aperture, and they are called F-STOPS, and when photographers are abrreviating the F-STOP in writing, they write it out like f/8.0 (say that out loud using the phrase “f-stop of eight”). If I start with f/1.4 and then change to f/2.8 I have gone up by two stops.
So when a photgorapher tells you they take their picture on f/1.4, they are telling you that they took the picture with the diaphragm wide open to let lot’s of light in. Jasmine Starr, one of my favorite photographers, has said many times that she shoots “wide open”, and she is saying that she likes to shoot somewhere around f/1.4.
So do you understand what aperture is now? It’s the size of the opening of the diaphragm.
What does aperture do for my pictures?
Aperture affects the depth of field. Depth of field, is quite simply, the portion of a scene that appears sharp in an image.
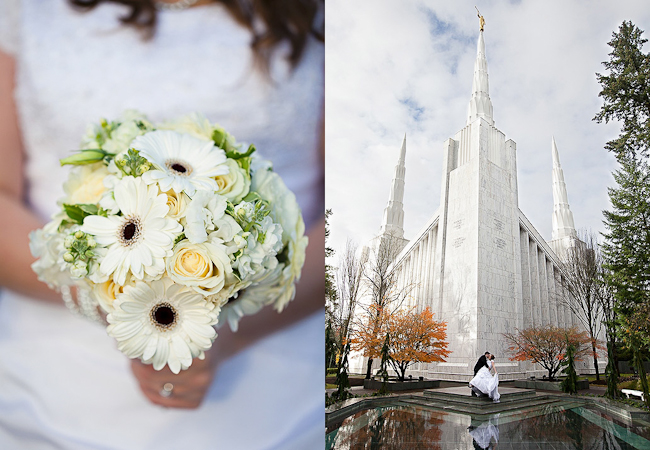
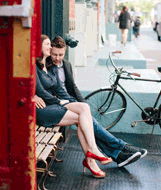
The photo on the left illustrates a very shallow depth of field. She is holding the bouquet next to her body, but only the flowers are in focus. A photo with all parts in focus has a very large depth of field.
I wanted to show you how changing the f-stop changes the depth of field, and so I attached the Canon 50mm f/1.4 lens to my camera, which opens up all the way to f/1.4. I started out by arranging the dog and the fire truck so that they were going to be varying distances away from me. If they were all lined up in the same “field” or plane together, I would be able to have no depth of field. Does that make sense? You will see in a second.

I started out with a very small aperture. f/22
An aperture of f/22 has a very great depth of field, so all the things in my photo are in focus.

As you scroll down through these images, pay attention to the face of the man in the fire truck. You’ll be able to see less and less detail, and eventually the eyes disappear completely.


Then I stopped down all the way to f/4.0. This photo has a shallower depth of field than the ones above.

Next I stopped down as far as my lens would go, to f/1.4. See how only the very front of the dog is in focus?

Now I’ll teach you the trick that helped me to remember how aperture works.
A smaller number will have less in focus.
Isn’t that super easy to remember? So when you are out taking picture of a squirrel, and you want just the squirrel to be in focus you can think “I should take my aperture number down to f/2.8 so that I can have just the squirrel in focus and not the entire tree he is sitting in!”
Smaller number = less in focus. You’ve got it, right?
Here is a side by side comparison of the difference between f/22 and f/1.4. The photo on the right illustrates why I like shooting very wide open, with small aperture numbers, because it makes the out-of-focus items in the photo so creamy.
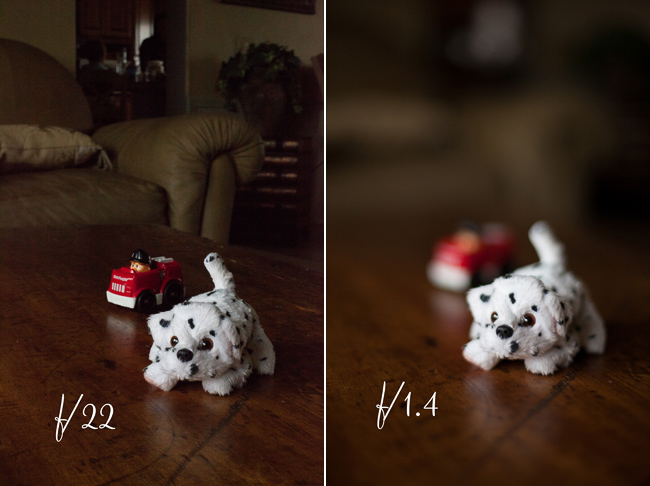
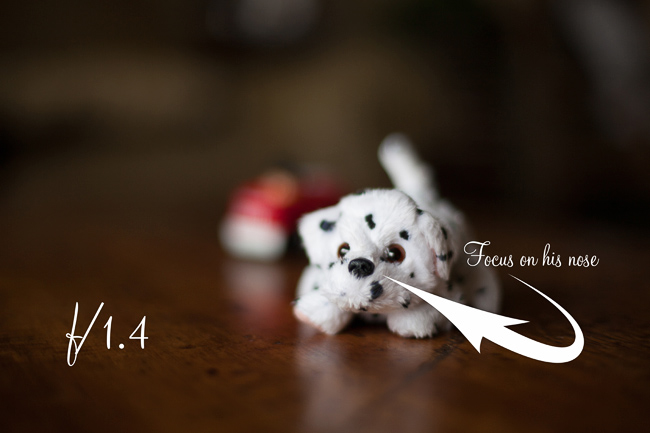
Shooting with an aperture of f/1.4 can be tricky though, because the depth of field (DOF) becomes a little sliver.
In this photo, the focus is on his ear, and his nose is out of focus.

In this one, I focused on his nose, and now his ear is out of focus. When you’re shooting a close-up portrait of someone, f/1.4 is usually too wide. I like to stick with something closer to f/2.2 for most of my work.
Though I like to shoot with a very wide aperture (small number) quite often, there are times when a larger number is necessary. When I’m doing group portraits at a wedding, I have to remind myself to move my aperture to something closer to f/8.0 to make sure that both the bride in the front of the picture, and her 6th-cousin-twice-removed four rows back are both within the DOF for that setting. Otherwise that cousin of hers, the one she hasn’t seen in 10 years, will be blurry!


To be clear, aperture is not depth of field, it merely affects what the depth of field is in a photo.
Aperture, out of all of these concepts, is the one where you most need a dSLR to manipulate it. I took these photos with a lens that has an aperture range of f/1.4-f/22, which is something that a point and shoot just can’t have.
———————————————————————————————————————————
I hope that this series of very basic explanations has helped inspire you to start expirementing with your photos a little bit more. I encourage you to practice, practice, practice, because that is how I came to understand them like I do. I spent so many hours on my tummy taking still photos of food and other objects around the house for my blog posts, and over time I began to better understand how ISO, Aperture, and Shutter Speed work together to create beautiful, well-lit photographs.
I reccomend starting with still life shots in the same lighting conditions. Learn how to take pictures of things using the three concepts (ISO, Aperture, Shutter Speed) all in the same light. Then move to a different lighting condidion and practice there. Over time you will slowly be able to jump from place to place, taking picture with varying shutter speeds, ISO settings, and different depths of field.
Then the day will come that you find yourself shooting exclusively on manual because you like having the power to take the photographs you want to take, not what the camera tells you to take. It’s a wonderful feeling!
Also:

 I'm a farm-raised almost-crunchy stroller-pushing picture-taking lifestyle-blog-writing gastronomy-obsessed divine-seeking thrift-store-combing cheese-inhaling pavement-pounding laughter-sprinkling lover of individuality and taking chances.


You are seriously so good at explaining these things. I think one reason your so good at it (besides natural teaching ability) is because you figured it out and taught yourself all this stuff in recent years. There’s no way I’d be able to explain it the way you do because I learned about aperture so long ago that I wouldn’t even know which words people didn’t already know! Great job!!
1This was a great series - I really liked learning about it in normal-person terms. Thanks Jenna. Now I won’t be so scared of our SLR.
2I really like your series of photography explanations - they actually make sense!
I really like the use of small apertures in photos because they always look so neat!
3i’ve been teaching myself photography over the past couple of months, and i’ve struggled with aperture/shutter speed. i usually just shoot in program mode so i don’t have to worry about it. i’ve actually enrolled in a digital photography class as an elective for next semester, and i’m beyond excited. i love your explanations-they are really helpful. i do have a question though. i have a problem with the relationship between aperture and shutter speed, so could you please explain how to adjust one for the other when in manual mode? thanks
4Loved Loved all of your explanations! Thank you! I look forward to experiementing with my camera. I do want to know how you get such CLEAR and SHARP photos. I am sure part of it has to do with your camera…but would you mind sharing what your settings are for your photos…For instance any on your site such as the White children…or some of your marriage/engagement sessions. Please do tell. I want my photos to look as good as yours! Possibly a list of when to use what settings…sort of putting together everything that you have discussed so far.
Jenna Reply:
March 28th, 2009 at 12:05 am
I wish it were so easy as to put things in a list like that! If so, I think those lists would be floating around the internet all over the place and everyone would take better photographs.
Unfortunately, combining all three settings (ISO, aperture, and shutter speed) is incredibly difficult and there is absolutely no magic formula for putting the three together, in any situation.
Take the tea ceremony I shot today as an example. It was rather dark, and I had to make choices like “Do I want ot keep my ISO this high because doing so will result in grainy images?” But turning my ISO down just didn’t seem possible because of how dark it was in the room. I couldn’t turn my shutter down to anything less than 1/160 or else people were blurry as they accepted gifts and served tea. And I needed to keep my aperture at a setting that would allow two people to be in focus at a time. It was really tough (but a challenge I love!)
When I’m shooting, I spend a lot of time taking “test” shots. I take a picture, look at my histogram (I think I’ll go over histograms next week), and then turn my settings up or down from there. It’s a whole bunch of trial and error!
For each and every situation you must take into account what kind of depth of field you want, if you want your subjects in sharp focus or if you want something blurred, and what setting your ISO needs to be at depending on how much light you have.
So I guess that is a long way to say the only way to understand what settings to use in certain situations is to get out and learn it for yourself
I’m truly enjoying your blog. Thank you so much for taking the time to teach us this week. I’ve been practicing each technique each night.
Thanks again!!
6Jenna, I’ve really enjoyed these posts- you explain it all so well. I had a steep learning curve with all of this last year and I can confidently manipulate my settings now. Something I’d love to read more about is the post production manipulation you do with your photos! Thanks!
7Thank you approximately 500 times over for publishing this series.
It’s all so much simpler than I realized! I must experiment soon
8I love how the dwarf looks unhappy about the kissing bears - so cute!
9I agree with you about the dwarf. Great choice of subjects!
10I finally understand aperature! I’ll have to remember that the F in fstop is kind of like “focus” - and use your memorization device about smaller numbers mean less in focus. I shoot like this once in a while, only I use the Portrait mode on my camera…it’s the only time so far I’ve ventured from Auto mode!
thanks!!!
11I have been a lurker for a few days but I wanted to say a huge THANK YOU for your photography series. My fiance and I just got a new dSLR camera and we have been playing around with it. He is more versed in photography than I am and your series helped me to clarify some terms and allowed him to brush up.
I look forward to reading more.
Thanks so much!
12Was wondering if you would mind explaining how these things all relate to each other. Enjoy your birhtday dinner!
13So I read all the posts in this series, including this one, and thought to myself how interesting, informative and well-written (and illustrated) they were, but I didn’t really link it to my own desire to take better photos, at least not for now, because, y’know, my mind is elsewhere at the moment
But then I woke up this morning from a long dream where I had a camera in my hand the entire time and my brain has basically been processing the aperture/ shutter speed thing in my sleep.
I splurged on a new camera just after Christmas (a “bridge” Fujifilm PinePix S1000fd) and had a lot of fun the first few weeks playing with the various automatic modes. I read the manual very carefully (I always do!) right up to the point where it went onto manual settings. I thought I would come back to that later once I’d had a good play with all the automatic modes.
So this morning, I literally woke up from this dream, went straight to my camera and looked to check the manual modes, and it has one where you can adjust shutter speed manually, one where you can adjust aperture manually and one where you can do both. And now, thanks to this little tutorial, I’m really looking forward to reading the rest of the manual and moving my photography on a bit. (Plus, it’s spring now, so I should be able to shoot outside for more than five minutes without feeling like my fingers were going to fall off!)
Wow… long comment, basically just to say thank you for getting into my head by explaining this so clearly that my brain just had to have a go on its own in my sleep! I’ll let you know how I get on
Jenna Reply:
March 28th, 2009 at 9:26 am
I loved your long comment, as this was the whole reason I wrote the series. You’ll have pretty pictures of Baby Subrosa now.
So I was checking out a friend’s blog, and I came across a link to your photography posts-thanks so much for sharing your knowledge and experience in such a ‘user-friendly’ way! I have a keen interest in photography, but am sorry to say that any ability I have right now remains at the ‘instinctual’ level. I want desperately to get a dslr and take some classes, but for now, I only have a point-and-shoot that-until now-has left ALL to be desired. I had pretty much given up on taking even a half-way decent picture in my low-lit house-until today! Within minutes of reading your posts I was able to change some settings on my camera and for the first time was able to take a picture of my girls-without flash-that wasn’t blurry or dark! Yea!! Thanks again! And my camera thanks you, too, because it just got a new lease on life…I’ll keep it around a while longer.
15I just wanted to say again, how helpful these posts have been. McDreamy and I had some friends in last weekend from out of town who had just gotten engaged in December…I offered to snap a few shots of them as an engagement present! They are nowhere near your quality but I think I did okay for my first try. Maybe I could email you some of them and you could give me your critiques?!!?
16Very nice pictorial explanations, Jenna. How is the aperture/f-stop number related to focal length? Does longer lenses (e.g: 70-300mm) mean they have smaller f-stop number? I’m trying to see what type of lens I need for full-body portraits with depth of field effect.
17Thanks.
Great visual explanation using the bears and dwarf! Though, I do have to make one comment about your statement, “a BIGGER opening means a SMALLER aperture”. Because the number you’re talking about is in the denominator, technically the smaller it is, the larger the overall number. For example, 1/2 is actually larger than something like 1/10. So f/1.4 is a larger number than f/16 for the same focal length.
18Thank you for these posts! They have been very helpful! One thing I’m confused about —
“a BIGGER opening means a SMALLER aperture”.
Here’s the thing, I took notes and I swear I’ve had to go back 3 times to cross the same statement out and I’ve been back and forth with it. So now I’m all mixed up!
A bigger opening, (i.e f/1.4 has a big opening), that means smaller aperture? Wouldn’t that be a larger aperture? As in maximum aperture. That’s what I had in my previous notes.
And then when you wrote:
“I started out with a very small aperture. f/22″
Now when I think of this statement,
“a BIGGER opening means a SMALLER aperture,”
I get confused because isn’t f/22 a small opening and “small aperature” (as you stated above)? Ahh I’m obviously confused haha!
I promise you I am not trying to make you sound wrong in any way..I love your blog and all of these helpful posts, but I’m just confused now and looking for clarity so I can figure out all of this and actually understand it! Thanks again Jenna!
Jenna Reply:
March 1st, 2012 at 10:36 am
I should amend that to say “a bigger opening means a smaller aperture number”. I wrote these a long time ago so it’s nice to have some clarification!
I just kept repeating “smaller number less in focus” and things made a lot more sense.
And it looks like I have some dead links in those posts and need to get some new pictures up!
Thank you for the AWESOME explination!!!! Loved it! I am so very dissapointed that the example photos are not available???
sincerely,
Debra~ Midpines mountain Mama~
Jenna Reply:
March 18th, 2012 at 11:53 pm
Thanks Debra! I really need to fix the post (and plan to do so soon). Thank you for the reminder.
Thank you so much for the great explanation! I just took my first photography course and was still slightly confused about this - you cleared it RIGHT UP! Love smaller number = less in focus! AWESOME!
21Thanks for the clear explanation of aperture, I’ve been so frustrated I actually thought about selling my camera, you have inspired me to keep going and practice more!
22Wow, I always understood that small 3 = larger opening, but didn’t get the dof until you explained it. I know I’ve had it explained many times, but I had an ah-ha moment when I read this. THANK YOU!!!
23